这次有个H5页面需要动画效果,习惯性想到了gif实现,但是gif文件大,不易加载,尤其在手机端非常的不友好。又想到了CSS3通过关键帧实现,但是关键帧适合比较简单的动效,比如上下抖动,下雪下雨漂浮的白云,想要实现运动轨迹的飞机则相对复杂。所以上网查了下,发现可以通过SVG定义运动路线,还能定义此形状在某一时间点发生的某种变化。
运动轨迹path,可以通过点击查看实现。

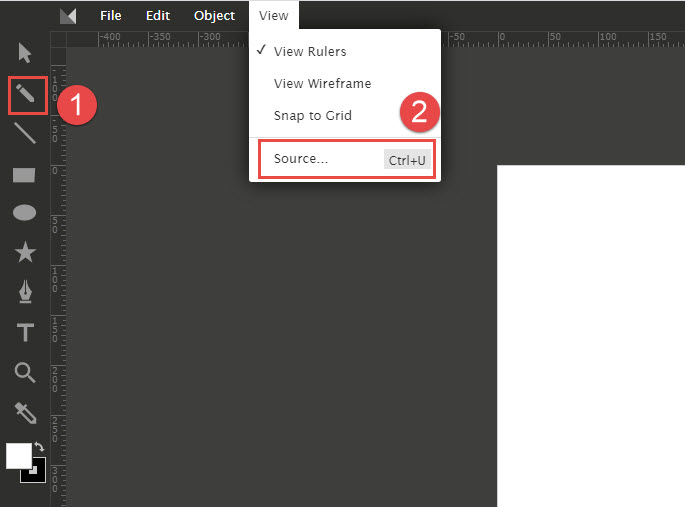
如上图,使用铅笔工具描绘出运动轨迹(步骤1),再点击view->source导出path代码,复制黏贴到我们的代码中即可。
完整代码如下,注意这里有个属性:additive="sum",此属性规定正在进行动画行为的属性是否可以进行附加(默认情况下,高优先级的动画会被低优先级的覆盖)。这里需要animateTransform的2个动画都有效。
<svg viewBox="0 -120 750 1344">
<!--运动的路径轨迹-->
  <path d="m0,94c0,0 1.29289,-0.70711 2,0c0.70711,0.70711 0.61732,2.07612 1,3c0.5412,1.30656 2.17309,2.85273 3,4c1.30745,1.814 2.4588,2.69344 3,4c0.38268,0.92388 0.61732,2.07612 1,3c0.5412,1.30656 2.17309,2.85273 3,4c1.30745,1.814 1.07612,2.61732 2,3c1.30656,0.5412" id="motionPath" stroke-width="1.5" fill="none"/>

<!--运动的图片-->
<image id="car"  width="120px" xlink:href="images/step1-plane.png">
    <!-- <animate attributeName="rotate" values="30;20;10;0" keyTimes="0,1,2,3" dur="4s" repeatCount="indefinite" /> -->
    <animate attributeName="transform" values="30;20;10;0" dur="4s" repeatCount="indefinite" />
</image>

<!--运动的相关参数  1、href链接到图片   mpath链接到路径-->
<animateMotion xlink:href="#car" dur="4s" begin="0s" fill="freeze" repeatCount="indefinite">
    <mpath xlink:href="#motionPath" />
</animateMotion>

<!-- animateTransform元素变动了目标元素上的一个变形属性,允许动画控制旋转。 -->
<animateTransform xlink:href="#car" attributeType="xml" attributeName="transform" type="rotate" from="60" to="0" dur="4s" repeatCount="indefinite" additive="sum"/>

<!-- animateTransform元素变动了目标元素上的一个变形属性,允许动画控制缩放。 -->
<animateTransform xlink:href="#car" attributeType="xml" attributeName="transform" type="scale" from="0" to="2" dur="4s" repeatCount="indefinite" additive="sum"/>
</svg>
这里还有一个很有用的属性viewBox,在手机端定义此属性可以完美适配手机尺寸。和其他图形文字结合使用时,我们可以使用绝对定位,使动效成为“背景”。
这里定义的画布尺寸是200200px。但是,viewBox属性定义了画布上可以显示的区域:从(0,0)点开始,100宽100高的区域。这个100100的区域,会放到200200的画布上显示。于是就形成了放大两倍的效果。
<svg width="200" height="200" viewbox="0 0 100 100"></svg>


